


These gluten-free ciabatta rolls have a crunchy crust and light open crumb with irregular air holes. It's a rustic bread that is perfect for sandwiches, soups, or fresh out of the oven with butter.

Bread and baked goods are probably the most difficult things to give up on a celiac diet. But what I've learned along the way is that you don't need to, and gluten-free baking actually tastes better. It also gives you the opportunity to explore new flours you would never have thought to use.
The Best Gluten-Free Ciabatta Rolls Recipes
This bread is a bit of a labor of love, but the art of bread-making in itself can be quite therapeutic to make after a long, hard week. Somewhat meditative. It is a bread that originated from Italy.
And yes, we have loads of breads to choose from on the blog. We love this Quick and Easy Gluten-Free Naan. So no, you are not restricted or deprived in any way. Here's a great Easy Gluten-Free Bread Recipe, which has a lot of love from our readers. It's just a new way of being and exploring new things.

Why You’ll Love These Gluten-Free Ciabatta Rolls
Perfect texture - It has the crispy crust and those perfect bubbles inside.
Great for sandwiches - This bread is lovely with some cheese, cold meats, and sliced tomato. I do, however, always take a roll straight from the oven and drench it in butter, which melts, and it's so good.
Freezes well - This bread freezes well, so it is nice to make a few and reheat them in the air fryer or oven.
Ingredients For These Gluten-Free Ciabatta Rolls
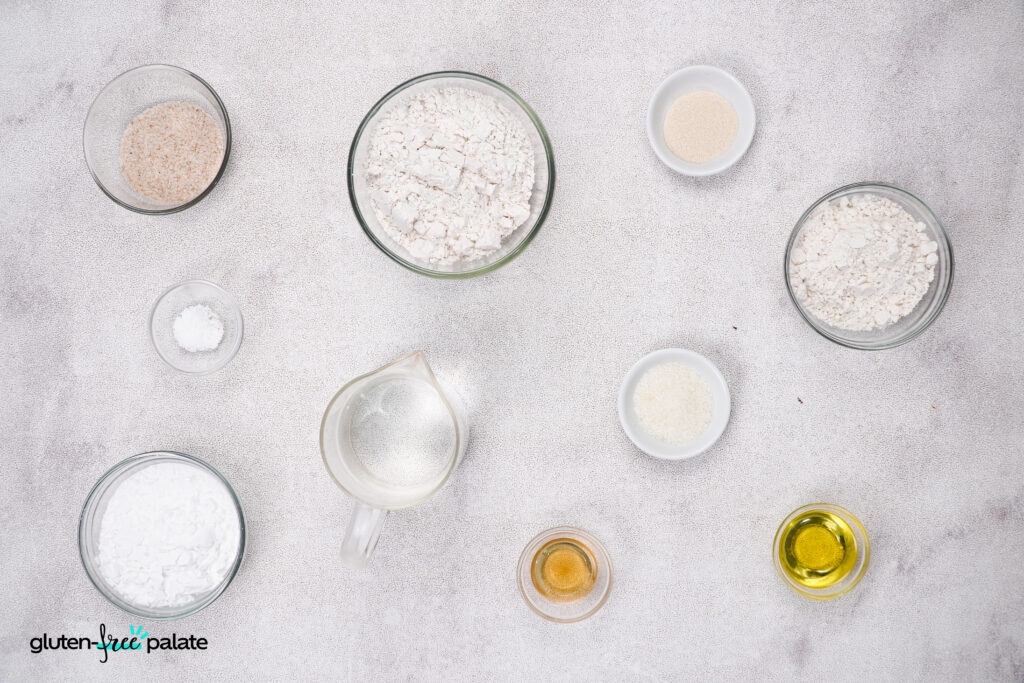
The key ingredients in this recipe are the blended flours. We'll discuss exactly how to make them below.
You only need a few ingredients to make this beautiful bread.
- Psyllium husk – Psyllium is a gluten replacement in this recipe. When mixed with water, it forms a gel that traps air, helping the bread rise and giving the rolls that chewy, flexible texture ciabatta is known for.
- Lukewarm water – Warm water activates the yeast and helps the psyllium hydrate. Make sure it’s not too hot, or it may kill the yeast.
- Buckwheat flour – A naturally gluten-free flour with a nutty flavor. It adds depth of taste and a sturdy structure to balance the lighter starches. Note that quality varies for this type of blend.
- Tapioca starch – Provides elasticity and chew. It also helps create the light, airy interior.
- Sorghum flour – A mild, slightly sweet gluten-free flour that softens the flavor of the buckwheat. It adds to the tenderness. Note that it also has challenges as a stand-alone flour. It's best in a blend here.
- Granulated sugar – This is used to feed the yeast, helping the dough rise.
- Instant yeast – The leavening agent that gives these rolls their lift and those airy holes we all love.
- Salt – Balances the flavors and strengthens the dough structure.
- Olive oil – Adds richness and moisture, keeping the rolls from drying out too quickly. It also adds flavor.
- Apple cider vinegar – A little acidity strengthens the dough and helps get a better rise.
Equipment Needed
A medium bowl is used for mixing the psyllium gel, and a larger mixing bowl for combining the flours and dough.
Use a whisk and either a silicon spatula or a hand mixer (needs to have a high wattage) or stand mixer with a dough hook attachment to bring the sticky dough together. Line your tray with parchment paper to prevent sticking, and if you have a baking stone or steel, it will help achieve that classic rustic crust.
You’ll also need a baking tray to hold ice cubes for steam, plus a sharp knife or bench scraper to cut the dough into portions. During the rise, cover the rolls with a kitchen towel, and once they’re baked, transfer them to a wire rack to cool so the bottoms don’t go soggy.

How to Make These Gluten-Free Ciabatta Rolls
Here you'll learn (if you haven't used it before) how to use psyllium husk and yeast. Gluten-free baking is a bit different, but with these step-by-step directions, you can visually see the process.
Prepare psyllium husk and mix dry ingredients


In a medium bowl, whisk together psyllium husk and lukewarm water. Stir well and let it sit for 5–10 minutes until it thickens into a gel.
In a large mixing bowl, whisk together buckwheat flour, tapioca, sorghum flour, sugar, yeast, and salt.
Make The Dough And Roll It Out


Add the psyllium gel, olive oil, and apple cider vinegar into the dry mix. Stir with a silicon spatula or dough hook until a sticky dough forms (it will be looser than wheat dough, closer to a thick batter). Shape dough into a ball, then press into a 10x8 in (25x22 cm) rectangle.
Cut And Rise


Cut into 6 pieces, flip so the floured side is on top. Place on a parchment-lined tray, spaced apart. Cover lightly with a kitchen towel and let them rise in a warm spot until doubled in size (about 2 hours). Preheat the oven to 475ºF (250ºC) with a baking stone/steel and a tray at the bottom.
Bake, Cool, And Serve


Slide rolls (on parchment) onto a hot surface. Add 5–6 ice cubes to the bottom tray, reduce the temperature to 425ºF (220ºC). Bake for 10 minutes with steam, then remove the steam tray. Continue baking for 15 more minutes, until the rolls are golden brown.
Transfer the rolls to a wire rack and let them cool completely before slicing.
Tips For Making Gluten-Free Ciabatta Rolls
So if you've never made these before, here are some things to consider:
- Use psyllium husk powder wisely – It’s the key to structure and chew in gluten-free breads. Let it sit in water until it forms a gel then combine it with the flours.
- Expect a sticky dough – Handle it with a spatula and floured hands.
- Don’t skip the steam – Adding ice cubes to a hot tray in the oven creates steam, which helps the ciabatta develop its signature crisp crust.
- Use a baking stone or steel if possible – Preheating one gives the rolls a better rise and helps mimic the rustic crust of traditional ciabatta.
- Let them rise fully – Gluten-free breads don’t have the same spring as wheat breads, so allow the dough to double in size before baking.
- Cool before slicing – These rolls need time to set. Cutting them too early will make them gummy inside.

Frequently Asked Questions
I've answered some questions you may have.
How Do I Store And Reheat Gluten-Free Ciabatta Rolls?
Store at room temperature in an airtight bag for 1–2 days. Reheat them in the oven or air fryer before serving to bring back the crusty texture.
Can I Freeze Gluten-Free Ciabatta Rolls?
You can freeze these rolls for up to 3 months in a freezer bag.
Can I Make Them Without Psyllium Husk?
We'd recommend sticking close to the recipe. Unlike some of our favorite gluten-free dinners, swapping ingredients with baked goods like these ciabatta rolls will lead to a different texture entirely.
Gluten-Free Ciabatta Rolls

These gluten-free ciabatta rolls have a crispy, golden crust and an airy interior you'll love.
Ingredients
- 3 tbsp ground psyllium husk
- 1 ½ cup lukewarm water
- 1 cup buckwheat flour
- ½ cup tapioca starch, plus extra for flouring the surface
- ½ cup sorghum flour
- 2 tsp apple cider vinegar
- 1 tbsp granulated sugar
- 1 tbsp instant yeast
- 2 tbsp olive oil
- ½ to 1 tsp salt
Instructions
- In a medium bowl, whisk together psyllium husk and lukewarm water. Stir well and let it sit for 5–10 minutes until it thickens into a gel.
- In a large mixing bowl, whisk together buckwheat flour, tapioca, sorghum flour, sugar, yeast, and salt.
- Add the psyllium gel, olive oil, and apple cider vinegar into the dry mix. Stir with a silicon spatula or dough hook until a sticky dough forms (it will be looser than wheat dough, closer to a thick batter).
- Shape dough into a ball, then press into a 10x8 in (25x22 cm) rectangle.
- Cut into 6 pieces, flip so the floured side is on top. Place on a parchment-lined tray, spaced apart.
- Cover lightly with a kitchen towel and let them rise in a warm spot until doubled in size (about 2 hours)
- Preheat the oven to 475ºF (250ºC) with a baking stone/steel and a tray at the bottom.
- Slide rolls (on parchment) onto a hot surface. Add 5–6 ice cubes to the bottom tray, reduce the temperature to 425ºF (220ºC).
- Bake for 10 minutes with steam, then remove the steam tray.
- Continue baking for 15 more minutes, until the rolls are golden brown.
- Transfer the rolls to a wire rack and let them cool completely before slicing.
Notes
- Use psyllium husk powder wisely – It’s the key to structure and chew in gluten-free breads. Let it sit in water until it forms a gel, then combine it with the flours.
- Expect a sticky dough – Handle it with a spatula and floured hands.
- Don’t skip the steam – Adding ice cubes to a hot tray in the oven creates steam, which helps the ciabatta develop its signature crisp crust.
- Use a baking stone or steel if possible – Preheating one gives the rolls a better rise and helps mimic the rustic crust of traditional ciabatta.
- Let them rise fully – Gluten-free breads don’t have the same spring as wheat breads, so allow the dough to double in size before baking.
- Cool before slicing – These rolls need time to set. Cutting them too early will make them gummy inside.
Recommended Products
As an Amazon Associate and member of other affiliate programs, I earn from qualifying purchases. They never cost you extra.


Nutrition Information:
Yield:
6Serving Size:
1Amount Per Serving: Calories: 211Total Fat: 6gSaturated Fat: 1gTrans Fat: 0gUnsaturated Fat: 5gCholesterol: 0mgSodium: 200mgCarbohydrates: 39gFiber: 7gSugar: 3gProtein: 5g
This nutrition info is based on the exact ingredients and brands used at the time. It may not be 100% accurate. Please check your ingredients nutrition labels.
If you make this gluten-free ciabatta rolls recipe, please consider stopping by and letting me know what you think.
DID YOU MAKE THIS RECIPE?
Tag @glutenfreepalate on Instagram and hashtag it #glutenfreepalatebaker so we can see all the deliciousness!

Leave a Question or Comment