

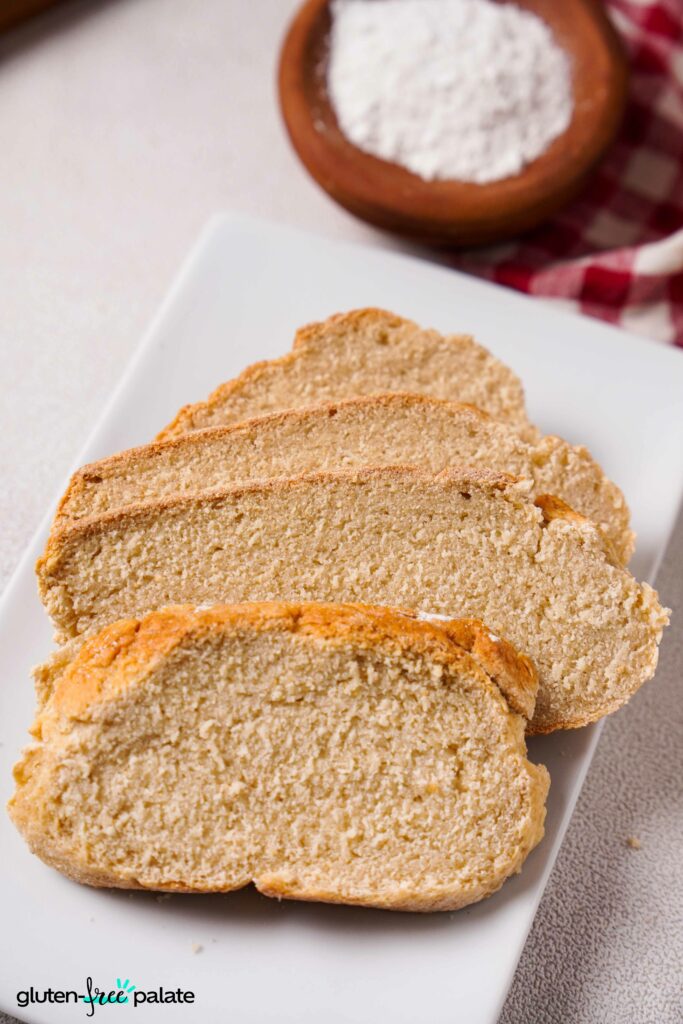
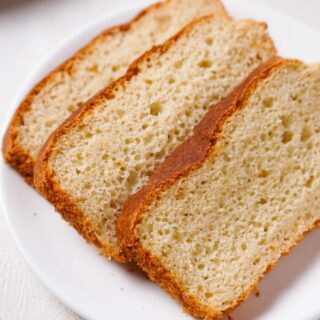
Imagine the aroma of freshly baked gluten-free bread wafting through your kitchen. All you need is this easy gluten-free artisan bread recipe. Get ready to enjoy a rustic loaf with the perfect golden crust and chewy interior.
Making gluten-free bread recipes is rewarding; we've mastered the process so you can reap the rewards. Whether you're whipping up the classic Gluten-Free Bread, savoring the zesty taste of Easy Gluten-Free Sourdough, enjoying the crunch of a Gluten-Free Baguette, or appreciating the simplicity of Gluten-Free Yeast-Free Bread, each recipe offers different tastes and textures.
Ignite your passion for baking and the joy of sharing your lovingly crafted gluten-free breads. Sign up for this gluten-free artisan bread course.
Gluten-Free Artisan Bread Recipe
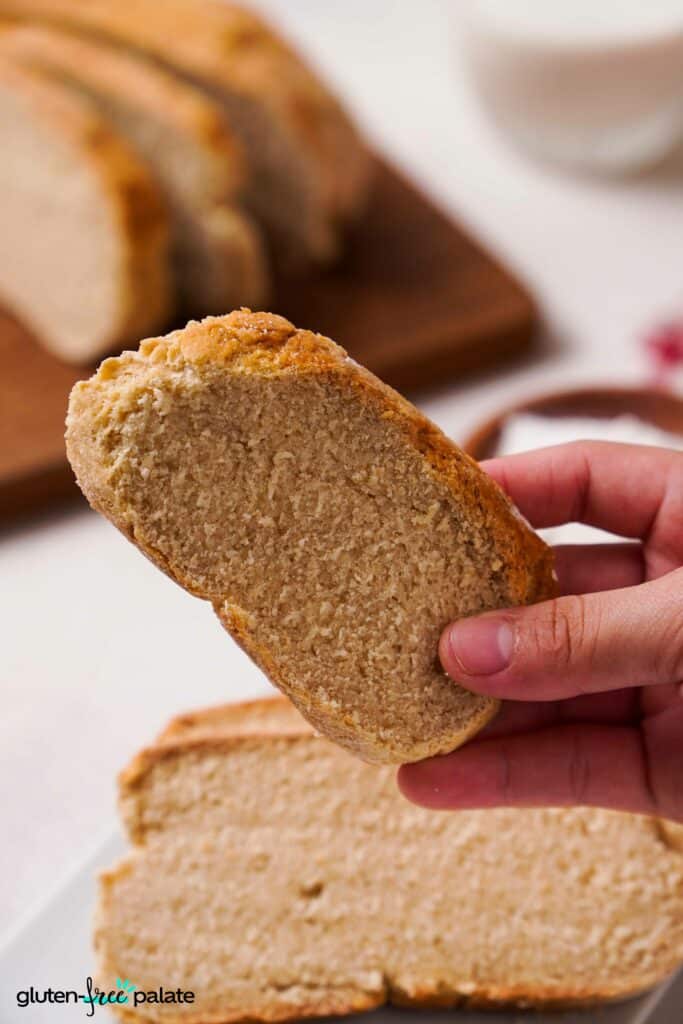
My love language is definitely an act of service, so seeing my family slather their GF artisan bread with some butter and strawberry jam brings me endless joy. To see their facial expressions and enjoyment makes my day.
If you have never made bread before, you may feel a bit nervous, but read through the instructions and follow all the details I've given, and you, too, will experience this joy with your family.
Baking bread has become popular again, and it is quite easy to make once you understand how everything works together. Be mindful of your gluten-free flour, which can make or break a recipe.
The bread-making process is not just about creating something to enjoy at the table; it's about crafting moments of happiness and connection with your loved ones. So give it a try! Their faces will make it all worth the effort!
Why You’re Going to Love This Gluten-Free Artisan Bread Recipe
Simple Ingredients - This recipe uses pantry staples, making it easy for you to make regularly. It works well for those weekly sandwiches for school or work.
No Special Equipment Needed - This bread comes together without complicated kitchen gadgets like a proofing basket or dough hook.
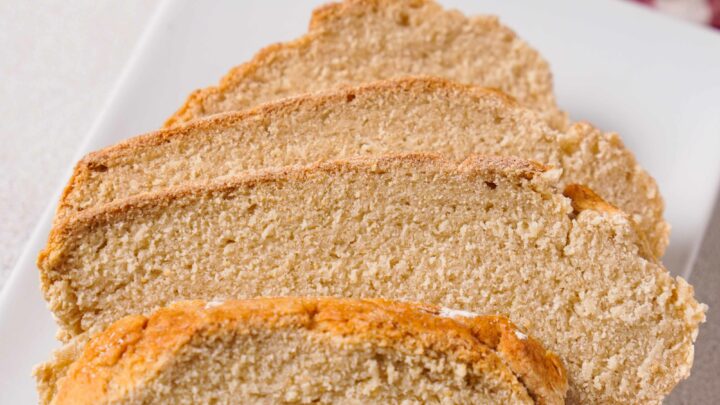
Perfect Texture - Achieve that coveted crispy crust and soft interior without gluten.
Versatile - This bread is perfect for all your favorite toppings and spreads.
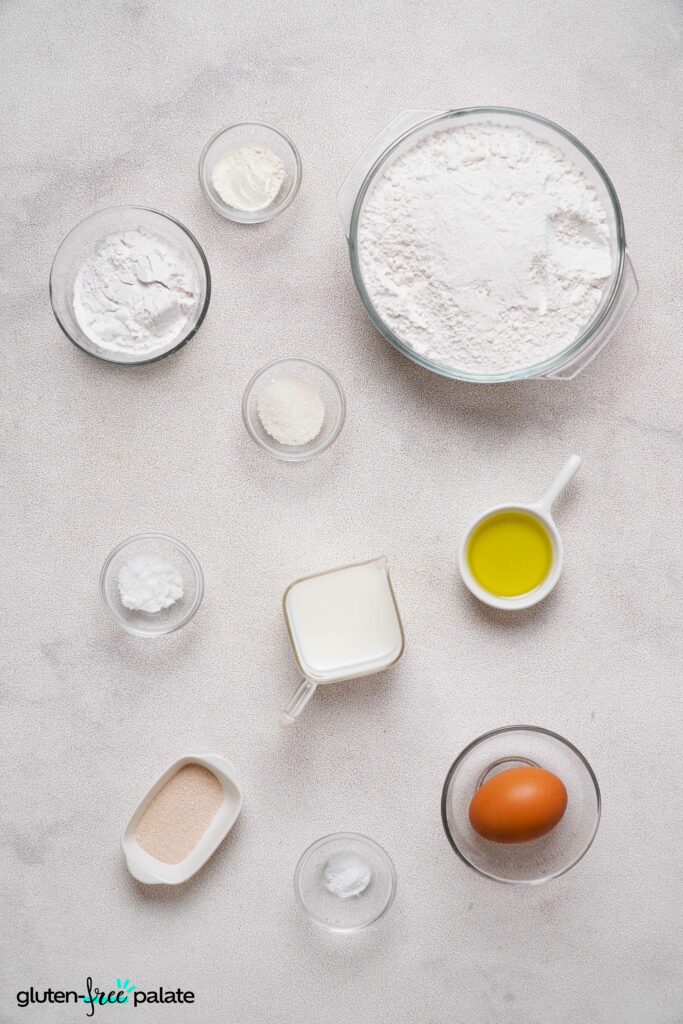
Ingredients in Gluten-Free Artisan Bread Recipe
All-Purpose Gluten-Free Flour Blend - Serves as the backbone of your bread, providing structure while keeping it gluten-free.
Xanthan Gum - Mimics the elasticity and viscosity of gluten. In gluten-free baking, xanthan gum helps to bind the ingredients together, giving the bread dough elasticity and allowing it to rise beautifully. If your blend includes it, skip this addition.
Tapioca Starch/Flour - Contributes to the lightness and chew of the bread. Tapioca starch helps create a crisp crust and a fluffy interior.
Sugar - Acts as food for the yeast, helping it to activate and cause the dough to rise. It also adds a bit of sweetness to the bread, balancing the flavors.
Instant Yeast - The leavening agent that makes the bread rise, creating a light and airy texture. Instant yeast works faster than active dry yeast, meaning you get to enjoy your bread sooner.
Baking Soda - Works with the yeast and helps to leaven the bread, which helps it rise and have a fluffy texture. It also helps with you getting that brown crust.
Salt - Adds to the flavor of the bread and helps with yeast activity so you get a slow and steady rise. This is so the texture is good.
Warm Milk - Hydrates the dry ingredients, activates the yeast, and contributes to the bread's tender crumb. Its warmth is important for yeast activation and dough development. We found that milk is better than warm water for this recipe.
Egg - Adds structure and richness to the dough, contributing to the bread's moist crumb. Eggs also help bind the ingredients together, improving the texture.
Olive Oil - Provides moisture and fat, adding to the bread's flavor, softening the texture, and contributing to a tender crumb. Olive oil also helps in preserving the bread, keeping it fresh longer.
Equipment Needed for This Gluten-Free Artisan Bread
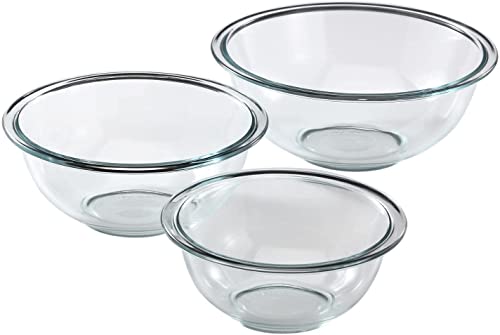
Large Mixing Bowls - The mixing bowls are for preparing and mixing the dough.
Dutch Oven - Creates the perfect environment for steam baking, which is crucial for a crispy crust. This is used instead of a loaf pan.
Digital Thermometer - This is an optional piece of equipment to check the bread's internal temperature to see if it is cooked through.
If you have any questions about making a Gluten-Free Artisan Bread, please leave a comment, and we will get back to you as soon as possible.
How to Make Gluten-Free Artisan Bread Recipe
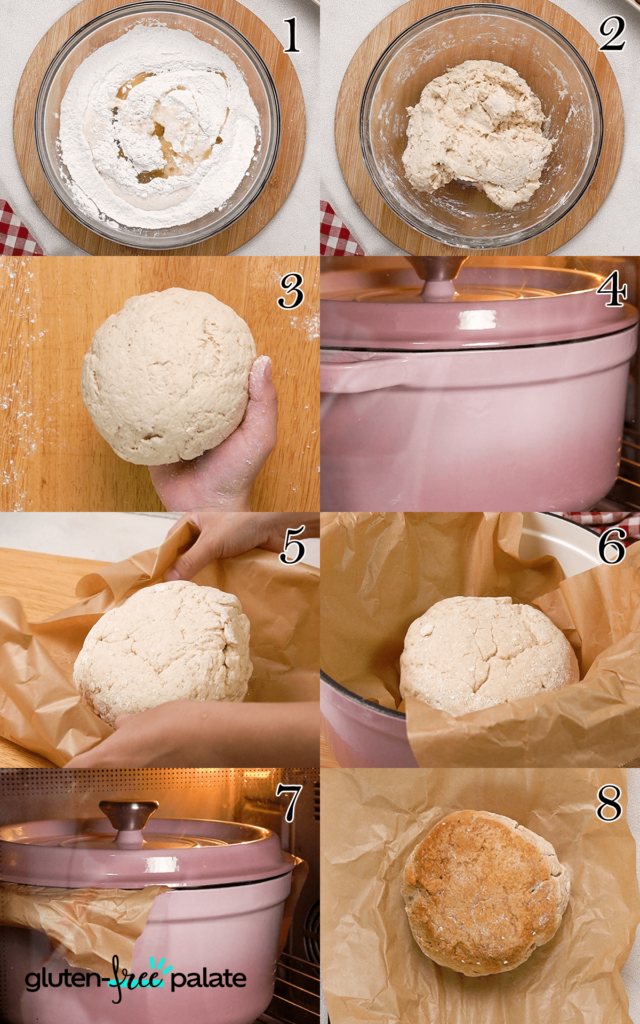
- Prepare a large bowl by lightly wetting and generously flouring it; set aside.
- In a separate bowl, combine the gluten-free flour blend, xanthan gum (if needed), tapioca starch, sugar, instant yeast, baking soda, and salt until well mixed.
- Stir vigorously warm milk, egg, and olive oil into the yeast mixture.
- Transfer the gluten-free bread dough onto a floured board, kneading until smooth, then form into a ball and place it in the prepared bowl. Cover with a kitchen towel and rest in a warm spot to proof until it doubles in size, about 30 minutes.
- Preheat a Dutch oven to 450°F with the lid on for 15 minutes.
- Carefully transfer the dough onto parchment paper, avoiding pressing down, and place it into the hot Dutch oven. Add 3-4 ice cubes around the parchment (not touching the dough), cover, and bake on the center rack for 35 minutes.
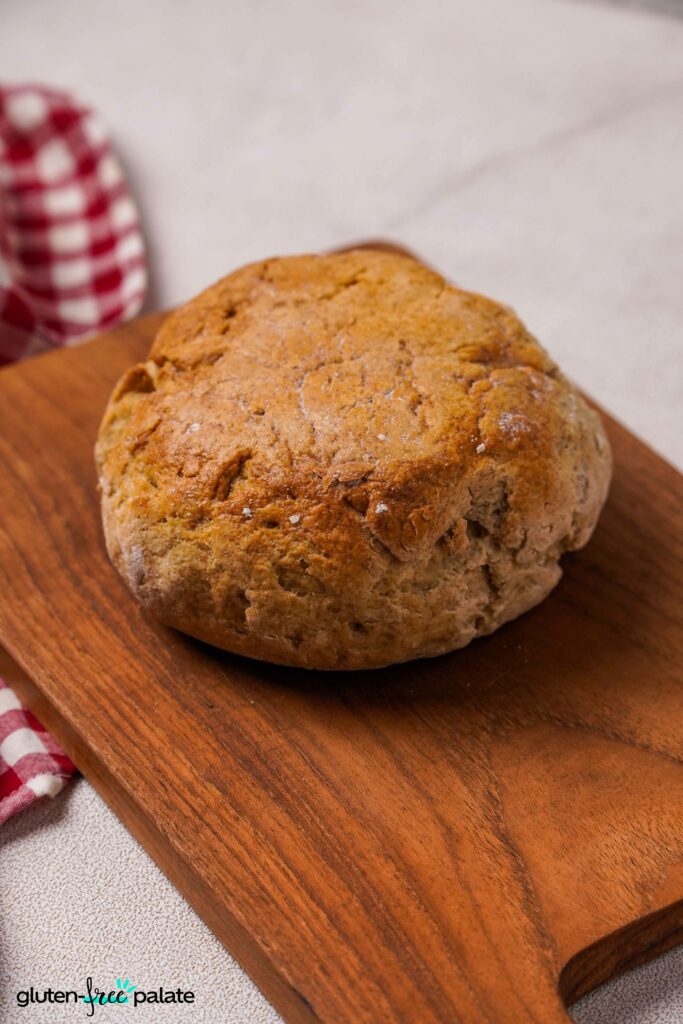
- Afterward, open the oven door and remove the lid, lower the oven to 425°F, and bake for another 20-25 minutes until the bread is fully browned.
- Once baked, transfer the gluten-free yeast bread on the parchment paper to a cooling rack and let it cool for 2-3 hours before serving. Enjoy your freshly baked bread!
Tips for Making the Best Gluten-Free Artisan Bread Recipe
Measure Ingredients Accurately - Ensures consistency and the perfect dough texture.
Room Temperature Ingredients - Helps the yeast activate and the bread to rise properly.
Do Not Rush the Rise Time - Patience during the rise is key to the best loaf, so don't be tempted to speed this up.
Use Ice Cubes for Steam - Creates a crispy crust by mimicking a professional steam oven.
Frequently Asked Questions
How Do I Store GF Artisan Bread Recipe?
Store the completely cooled bread in an airtight container at room temperature for up to 3 days.
Can I Freeze Gluten-Free Artisan Bread Recipe?
Yes, slice the bread once cooled with a sharp bread knife. Then, freeze it in airtight bags for up to 3 months. Reheat in the oven or toast it.
Can You Make This Crusty Gluten-Free Bread Recipe Ahead of Time?
Yes, prepare the dough and let it rise. Once doubled in size, it can be refrigerated overnight before baking.
What Substitutions / Replacements Can I Make in This Gluten-Free Artisan Bread Recipe?
Dairy-Free Milk - This can be used instead of regular milk if you have dairy sensitivities.
Egg Replacer - This can be used if you suffer from egg allergies or are vegan.
Different Gluten-Free Flour Blends - These may be used but can affect the texture and flavor so it is worth experimenting if you do not use the suggested flour.
Do I Have to Cover the Dough While Rising?
Yes, covering the dough during its rising time is so important. This simple yet crucial step keeps the dough from drying out, helping it to retain the moisture needed for a successful rise. A kitchen towel or plastic wrap can be used to cover the bowl.
How Can I Tell When the Bread is Done Baking?
Look for a golden brown crust to tell if your gluten-free artisan bread is fully baked, and listen for a hollow sound when tapping the bottom of the loaf.
For accuracy, check that the internal temperature has reached 205°F to 210°F (96°C to 99°C) using a digital thermometer. These signs indicate your bread is perfectly done and ready to cool.
How To Know When Your Loaf Is Properly Proofed?
To determine if your loaf is properly proofed, look for it to almost double in size and perform the finger dent test. Gently press your finger into the dough; if the indentation remains without springing back quickly, it's ready. The dough should also appear puffed and airy with a smooth surface. These indicators and the recommended proofing time will guide you to achieve the perfect rise before baking.
What Can I Serve My GF Artisan Bread With?
You can serve your bread with some of the following:
- Soups and Stews - A crusty gluten-free artisan bread slice is perfect for dipping into a rich and flavorful instant pot broccoli soup or a hearty stew.
- Sandwiches - Up your sandwich game using thick slices of gluten-free artisan bread as the base. Fill them with your favorite ingredients like avocado, turkey, and bacon for a delicious and filling school or work lunch.
- Dips and Spreads - Use your bread to enjoy a variety of dips and spreads, from creamy gluten-free hummus to rich chocolate hazelnut spread.
- Salads - A fresh, vibrant tuna salad with a side of gluten-free artisan bread makes a great light lunch.
View our step-by-step instructional video for this recipe on YouTube.
Gluten-Free Artisan Bread Recipe
This easy gluten-free artisan bread recipe has the perfect golden crust, a great-tasting center, and the best texture.
Ingredients
- 2 ½ cups all purpose gluten-free flour blend
- 2 tsp xanthan gum (omit if your blend already contains it)
- ¼ cup tapioca starch/flour
- 1 tbsp sugar
- 1 tbsp instant yeast
- ¼ tsp baking soda
- 1 tsp salt
- 1 cup warm milk
- 1 egg, room temperature
- 2 tbsp olive oil
Instructions
- Prepare a large mixing bowl by lightly wetting and generously flouring it; set aside.
- In a separate bowl, combine the gluten-free flour blend, xanthan gum (if needed), tapioca starch, sugar, instant yeast, baking soda, and salt until well mixed.
- Stir in warm milk, egg, and olive oil vigorously.
- Transfer the dough onto a floured board, kneading until smooth, then form into a ball and place it in the prepared bowl. Cover with a kitchen towel and let rest in a warm spot until it doubles in size, about 30 minutes.
- Preheat a Dutch oven at 450°F with the lid on for 15 minutes.
- Carefully transfer the dough onto parchment paper, avoiding pressing down, and place it into the hot Dutch oven. Add 3-4 ice cubes around the parchment (not touching the dough), cover, and bake on the center rack for 35 minutes.
- Afterward, remove the lid, lower the oven to 425°F, and bake for another 20-25 minutes until the bread is fully browned.
- Once baked, transfer the bread on the parchment paper to a cooling rack and let cool for 2-3 hours before serving. Enjoy your freshly baked bread!
Notes
- Measure Ingredients Accurately - Ensures consistency and the perfect dough texture.
- Room Temperature Ingredients - Helps the yeast activate and the bread to rise properly.
- Do Not Rush the Rise Time - Patience during the rise is key to the best loaf, so don't be tempted to speed this up.
- Use Ice Cubes for Steam - Creates a crispy crust by mimicking a professional steam oven.
Recommended Products
As an Amazon Associate and member of other affiliate programs, I earn from qualifying purchases. They never cost you extra.
-
 ThermoPro TP510 Waterproof Digital Candy Thermometer with Pot Clip, 8" Long Probe Instant Read Food Cooking Meat Thermometer for Grilling Smoker BBQ Deep Fry Oil Thermometer
 -
Amazon Basics Enameled Cast Iron Covered Round Dutch Oven, 6-Quart, White
-
Pyrex Smart Essentials 3-Piece Prepware Mixing Bowl Set, 1-Qt, 1.5-Qt ,and 2.5-Qt Glass Mixing Bowls, Dishwasher, Microwave and Freezer Safe


Nutrition Information:
Yield:
10Serving Size:
1Amount Per Serving: Calories: 155Total Fat: 4gSaturated Fat: 1gTrans Fat: 0gUnsaturated Fat: 3gCholesterol: 21mgSodium: 284mgCarbohydrates: 25gFiber: 1gSugar: 3gProtein: 5g
This nutrition info is based on the exact ingredients and brands used at the time. It may not be 100% accurate. Please check your ingredients nutrition labels.
Did you make this Gluten-Free Artisan Bread Recipe recipe? Please leave me a comment below, letting me know what you think.


Lisa
Can you make this Gluten Free Artisan bread bigger, by doubling, so it's not such a small loaf inside the big dutch oven?
Wendy Stoltz
Hi Lisa,
We have not tried it, but it should work. To make a larger gluten-free artisan bread, simply double all the ingredients and mix well. Keep in mind that a bigger loaf may need longer proofing and baking times, so adjust accordingly for the perfect texture and doneness. Happy baking!