

Whip up this simple and easy-to-make homemade gluten-free bread. It is a straightforward, no-fuss recipe with tips and information for success. This easy-to-make bread is the ideal base for any sandwich, perfect for your next lunch.


I've also included instructions for making this gluten-free bread in a bread machine for those who prefer to use a bread machine when making gluten-free bread. If you are vegan, I've included instructions, too!
Start your gluten-free baking with this Gluten-Free Yeast-Free Bread, this tangy, easy Gluten-Free Sourdough, and the sweet Gluten-Free Cinnamon Raisin Bread; each recipe has a different taste.
The Gluten-Free Hawaiian Rolls are one you need to add to your list, while the Gluten-Free Rye Bread is so good, too. Which one will you choose next?
Gluten-Free Sandwich Bread Recipe
I posted a gluten-free bread recipe back in early 2015. It was okay, but it wasn't the best gluten-free bread. It had a little bit of a quick bread texture. I also have a gluten-free bread recipe for the bread machine (see further down if you use a gluten-free bread machine).
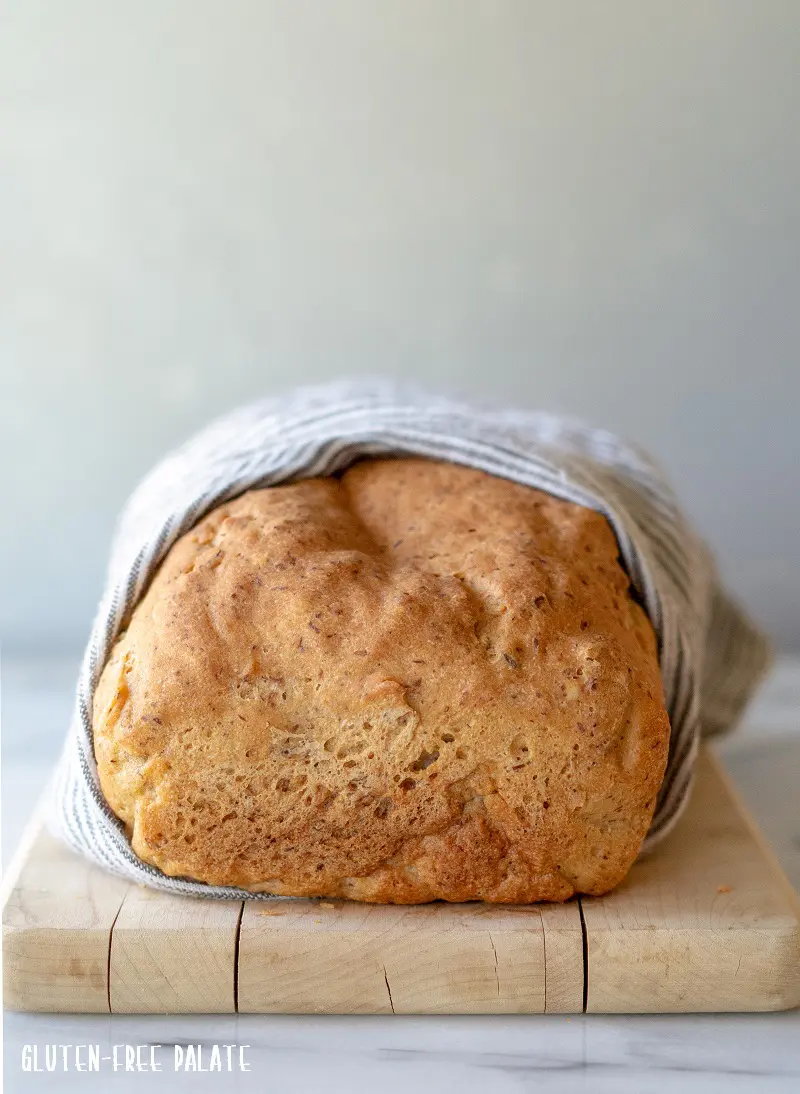
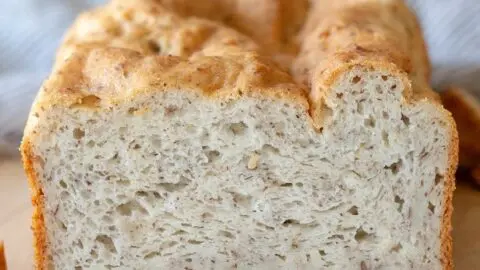
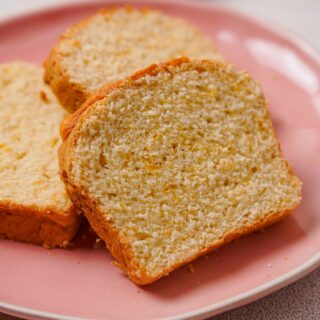
Just look at the texture of this easy gluten-free bread. It's amazing. The gluten-free loaf featured in this picture could've used a few more minutes in the oven, but I'll discuss that below.
You are going to love this gluten-free, dairy-free bread. I promise.
Please, please read through this post. I share my experience and what worked and didn't when I was reworking this gluten-free bread recipe.
Why You’re Going to Love This Gluten-Free Bread
Tastes so good - Leave the store-bought bread and enjoy real, fresh, homemade bread that tastes delicious.
Great for various diets - You can make this bread dairy-free, and I've also included a vegan option.
Simple And wholesome ingredients - This recipe blends gluten-free flours and natural ingredients. So, no nasties.
Ingredients in Gluten-Free Bread
For The Yeast Proof
Water (95°F-110°F) - The warm water activates the yeast, which is important for the bread to rise.
Sugar or Honey - This acts as food for the yeast, which helps activate it and produces carbon dioxide, which causes the dough to rise.
Active Dry Yeast - The key leavening agent, it ferments the sugars and creates air bubbles that make the GF bread light and fluffy.
For The Bread
White Rice Flour - This ingredient contributes to its structure.
Tapioca Starch - Adds chewiness and helps bind the ingredients, improving the bread's texture.
Potato Starch or Arrowroot Starch - This helps with the bread's moisture and is for that tender crumb.
Millet Flour or Almond Flour - Adds a nutty flavor.
Ground Flaxseed (Flaxseed Meal) - This increases the fiber content and can help bind the dough, similar to gluten.
Xanthan Gum - Replaces gluten's role by providing elasticity and stickiness. This is for the bread's structure.
Baking Powder - An additional leavening agent that helps the bread rise and achieve a light texture.
Salt - This is added for the overall flavor of the bread and regulates yeast activity.
Oil - Adds moisture and richness, contributing to a soft texture and extending the bread's shelf life.
Egg Whites - Provide structure and stability to the bread, helping it to rise and maintain its shape.
Apple Cider Vinegar - Improves the bread's texture and interacts with leavening agents for a better rise.
Equipment Needed for This Gluten-Free Bread
Loaf Pan - A standard-sized loaf pan of 9x5 inches works well.
Stand Mixer with Paddle Attachment - This is for mixing the dough so that the bread has the right texture. You don't need a dough hook for this recipe.
Mixing Bowls - Used for preparing the yeast-proofing mixture and combining the dry ingredients before mixing with wet ingredients.
Thermometer - To measure water temperature for yeast activation, ensuring it's within the optimal range (95°F-110°F).
Rubber Spatula - Useful for scraping down the sides of the bowl during mixing and transferring the dough to the loaf pan.
Plastic Wrap or Damp Cloth - To cover the dough during the rising process to create a warm environment to aid the yeast.
Wire Rack - For cooling the bread after baking, which helps to prevent sogginess and keep the bread's structure.
Serrated Knife - A serrated knife is for slicing the finished bread. It has a saw-like blade that helps to cut through the crust easily without squashing the center of the bread.
If you have any questions about making Gluten-Free Bread, please leave a comment, and we will get back to you as soon as possible.
Additional Gluten-Free Flours to use when making this gluten-free bread
I used my gluten-free flour blend when I first made this gluten-free bread recipe. It works great, but I realized it needed something more.
I tested several different flour blend options before settling on the winner, the one that I think makes the best gluten-free bread. See the recipe card for the gluten-free bread recipe that readers love.
Here are some additional options for making this gluten-free bread recipe. Note that these substitutions will yield slightly different results. If you decide to go with one of these substitutions, you will need to replace all the flours and starches in the recipe with the following (everything else stays the same):
- 2 ½ cups of my gluten-free flour blend + ½ cup of almond flour + ¼ cup flaxseed meal (ground flaxseed).
- 2 ½ cups of my flour blend + ½ cup of millet flour + ¼ cup of flaxseed meal. It's an amazing nut-free gluten-free bread.
- 2 ½ cups of Bob's Red Mill 1-to-1 gluten-free flour blend + ½ cup of almond flour + ¼ cup flaxseed meal.
- 2 ½ cups of Bob's Red Mill 1-to-1 gluten-free flour blend + ½ cup millet flour + ¼ cup flaxseed meal.
This gluten-free dairy-free bread recipe was originally developed for the oven, but I have a gluten-free bread machine recipe version below for those who like to use a bread machine.
How To Make Gluten-Free Bread
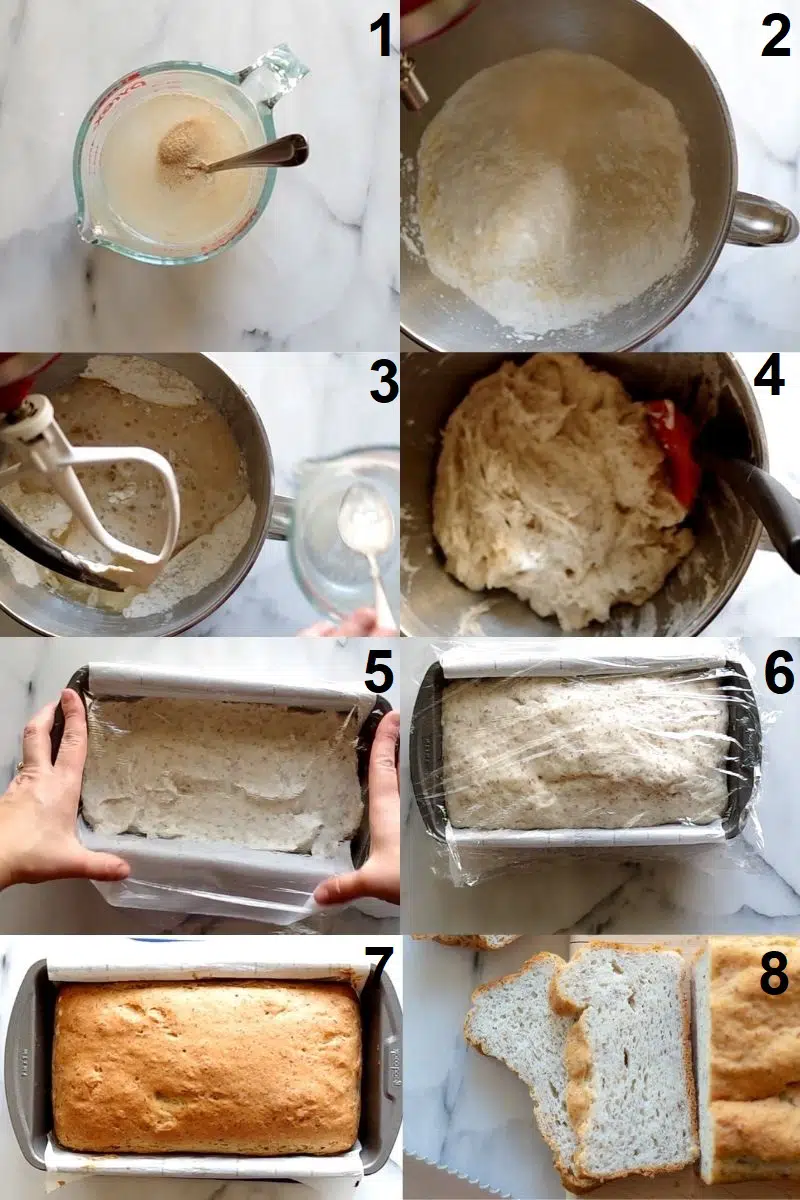
- Add the sugar and yeast to your warm water (95-110 degrees F) and stir; set it aside for 5-10 minutes but no longer.
- While your yeast is proofing, in the bowl of a stand mixer fitted with the paddle attachment, add the flours, flax seed meal, xanthan gum, baking powder, and salt. Turn your mixer to low and mix just until combined.
- Add oil, egg whites, vinegar, and proofed yeast mixture.
- Turn the mixer to a medium speed and mix for 2 minutes. The dough will be thick and sticky. Turn off the mixer and scrape down the sides.
- Using a rubber spatula, add the dough to your prepared loaf pan, filling in the corners of the pan and leveling the top. Wet your fingers and smooth the top.
- Cover the dough with a lightly oiled piece of plastic wrap and allow it to rise in a warm place for 45 to 60 minutes or until it has risen slightly above the loaf pan.
- When the dough is near the top of the pan, preheat your oven to 350°F. Remove the plastic wrap and bake for 60 – 65 minutes. Halfway through baking, cover the bread loaf with a piece of foil to keep it from over-browning.
- Remove the loaf from the oven and let cool completely before slicing. Slice the entire loaf and store in a container at room temperature for up to 4 days or in the freezer for up to a month.
Please see the recipe below for the complete ingredient list and instructions.
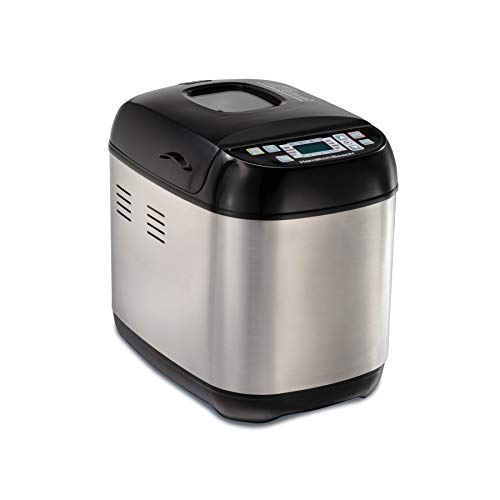
Gluten-Free Bread in a Bread Machine
If you prefer to make this gluten-free bread recipe in a bread machine, make sure you have one with a gluten-free setting. I have a Zojirushi bread machine and it makes a beautiful loaf and is my preferred gluten-free bread machine. There are other bread machines, just follow their instructions if they are different.
Check out our list of the Best Gluten-Free Bread Makers on the market today if you're looking to purchase one yourself. (I highly recommend it!)
- Add the warm water, oil, egg whites, and vinegar to the pan in your gluten-free bread machine. Do not add the yeast here. We are not proofing the yeast, we will add it in later.
- In a large mixing bowl, whisk together all dry ingredients except for the yeast (sugar, flours, flaxseed, xanthan gum, baking powder, and salt) and add to the bread machine pan on top of the wet ingredients, in a mound.
- Make a hole in the center of the top of the dry ingredients that are in the bread machine and add the yeast. Don't let the yeast touch the wet ingredients.
- If your machine has a "rest" setting, cancel it. You don't need it. With the Zojirushi you have to do this before you select any other settings.
- Select the gluten-free bread setting on your machine.
- Close the lid and press "start".
Please let me know if you have any questions about making this gluten-free bread recipe.
Egg-Free Substitution in Gluten-Free Bread
For a gluten-free vegan bread version of this gluten-free bread recipe, you can use chia eggs or Bob's Red Mill Egg Replacer (2 eggs worth).
I've only tested this gluten-free egg-free bread recipe in the oven. I haven't tested the egg-free version in a bread machine.
Swap out the 3 egg whites with 2 tablespoons of chia seed + 7 tablespoons of water (let sit for 5 minutes and stir before you add it to the mixture). Or use Bob's Red Mill Egg Replacer and mix up 2 eggs worth.
Bake for 70 minutes (putting a piece of foil over the loaf to help prevent over-browning, halfway through).
Dairy-free gluten-free bread recipe
I still can't get over how amazing this gluten-free sandwich bread is. It's better than any gluten-free bread I've had, and my family, including my gluten-eating husband, agrees.
This gluten-free bread is also dairy-free. I've tested it with dairy (milk for activating the yeast and butter instead of oil) and I found it to add to the quick bread texture.
If you want this gluten-free bread to have the same texture as deli-style sandwich bread, then you need to use water when activating the yeast, and oil instead of butter.
Trust me. Plus, it's less expensive to use water and oil in gluten-free bread recipes than it is to use milk and butter.
To make this a gluten-free vegan bread, see the instructions above for subbing out the eggs for chia eggs.
Related: Easy Gluten-Free Artisan Bread Recipe
Gum-free gluten-free bread
I use xanthan gum in this gluten-free dairy-free bread recipe. I feel it yields the best results.
Not everyone can have gums. You can use psyllium husk powder (not full husks) in this recipe. I only tested it once, but I used 3 tablespoons of psyllium husk powder in place of the xanthan gum - yes, that reads 3 TABLESPOONS.
Psyllium husk powder is not a 1-to-1 for xanthan gum. Again, I only tested this one time, so I cannot claim that this is the best sub for xanthan gum.
Sure, it worked for me, but I haven't checked to see if it's repeatable with that amount of psyllium husk powder.

Tips for making gluten-free bread

Here are my tips that work with this gluten-free bread recipe. See below for my gluten-free bread machine recipe.
Don't substitute anything in this gluten-free bread recipe unless I specified above that I've tested it. This is important. If you substitute something, I can't guarantee anything, and I can't help you troubleshoot if something doesn't work in your gluten-free bread.
Ingredients at room temperature work best. You can always run your eggs under warm water for a few minutes to keep the temperature up.
Read the recipe instructions and get all the ingredients out before you start.
Use dry active yeast or quick yeast. I use Fleischmann's yeast: it's labeled gluten-free. I've also used Red Star yeast.
If your bread sinks in the middle before it is done baking, you most likely let the yeast proof sit too long before using it, or you let your bread rise too long. You want to put your gluten-free bread in the oven when it rises just above the top of the loaf pan, no longer.
Ensure your water is between 95-110 degrees before adding the yeast. If you don't have a thermometer, I suggest you get one.
Line the loaf pan with parchment paper and then spray it with oil. This will help you remove the loaf from the pan.
Pan size matters. If you use a wider pan, your loaf will be broader and shorter. If you use a narrower pan, your loaf baking time might change.
Again, if you have any questions on how to make gluten-free bread, please leave me a comment below. I've included a video that shows step-by-step how to make gluten-free bread.
Frequently Asked Questions
How long to bake gluten-free bread?
This gluten-free bread recipe works best when baked for 60-65 minutes in the oven or on the gluten-free setting in a bread machine.
See my notes on the gluten-free bread recipe for the bread machine below.
Remember to cover your gluten-free bread with foil halfway through baking so it doesn't over-brown.
You might read that a loaf is done baking once it hits around 200 degrees F. Please bake this loaf 60-65 minutes, even if your thermometer says otherwise.
What size of a pan do I use to make Gluten-Free Bread?
This gluten-free bread recipe was developed using a 9 x 4 inch metal loaf pan. You can use a different size loaf pan, but you'll want to watch the cook time. Also, it won't have the same rise, depending on the size.
You can also make this bread recipe in a glass loaf pan lined with parchment paper. Metal and glass pans transfer heat differently, and gluten-free bread loaves typically have a thicker crust when baked in a glass pan.
How to store freshly baked bread
This fresh-baked bread stays soft for 2-3 days after it's been baked. You'll want to let it cool to room temperature before you slice it. We like to store it whole, in a sealed container, or wrap it tightly with cling wrap, and slice it as we need it.
After a day or two, we will freeze any bread that's left.

Can I freeze gluten-free bread?
Yes, you can freeze this gluten-free bread loaf. After it has completely cooled, slice the loaf into equal slices. We like to place a piece of parchment paper in between each slice, so it's easy to pull out of the freezer.
You can either defrost the bread in the microwave or you can let it sit at room temperature until it has thawed.
Why is my gluten-free bread dense?
If you are using a bread machine, does it have a gluten-free setting? This setting is essential because it only does one mix cycle, not two mix cycles, as you get with other settings.
If you don't have the gluten-free setting option, use a quick program with one mixing cycle rather than two when making gluten-free bread. Mixing it twice will always cause the bread to be denser.
Are you scooping your measuring cup into the flour? Or spooning the flour into the cups and then leveling? It would be best if you always spoon and then level. Otherwise, you'll end up with more flour than you want, which will cause the bread to be dense.
Are you storing your flours in the freezer or refrigerator? If flours are stored that way, they lose moisture, and when they are mixed with other ingredients, they tend to absorb more of the moisture, and the bread is denser.
Can I Double This Bread Recipe?
Yes, you can double this gluten-free bread recipe. When doing so, use two loaf pans to ensure even baking and consider slightly adjusting the yeast quantity to avoid over-proofing.
Be mindful of the mixer capacity for the increased volume of ingredients, and check for any necessary adjustments in baking time.
However, I recommend you try the recipe first. I usually make two doughs for two loaves as it is easier to handle and yields consistent results.
View our step-by-step instructional video for this recipe on YouTube.
Simple and Easy Gluten-Free Bread Recipe
Whip up this simple and easy-to-make homemade gluten-free bread. It is a straightforward, no-fuss recipe with tips and information for success.
Ingredients
For the yeast proof:
- 1 ¼ cup (10 oz.) water between 95°F-110°F
- 2 tablespoons (25g.) sugar (or honey)
- 2 ¼ teaspoons dry active yeast (a 7g. packets worth)
For the bread:
- 1 cup (145g.) white rice flour
- ¾ cup (85g.) tapioca starch
- ¾ cup (92g.) potato starch (or arrowroot starch)
- ½ cup (60g.) millet flour (or almond flour)
- ¼ cup (25g.) ground flaxseed (flaxseed meal)
- 2 ½ teaspoons (9g.) xanthan gum
- 1 teaspoon (5g.) baking powder
- 1 teaspoon (6g.) salt
- ¼ cup (2 oz.) oil of choice (I used avocado oil)
- 3 egg whites (75g.)
- 1 teaspoon (6g.) apple cider vinegar
Instructions
- Line a 8-inch x 5-inch metal loaf pan with parchment paper and spray it with cooking spray; set it aside.
- Add the sugar and yeast to your warm water (95-110 degrees F) and stir; set it aside for 5-10 minutes but no longer.
- While your yeast is proofing, in the bowl of a stand mixer fitted with the paddle attachment, add the flours, flax seed meal, xanthan gum, baking powder, and salt. Turn your mixer to low and mix just until combined.
- With the mixer still going, add the oil, egg whites, vinegar, and proofed yeast mixture.
- Turn the mixer to a medium speed and mix for an additional 2 minutes. The dough will be thick and sticky.
- Using a rubber spatula, add the dough to your prepared loaf pan making sure to fill in the corners of the pan and level the top. Wet your fingers and smooth the top.
- Cover the dough with a lightly oiled piece of plastic wrap and allow it to rise in a warm place for 45 to 60 minutes, or until it has risen slightly above the loaf pan.
- When the dough is near the top of the pan, preheat your oven to 350°F.
- Remove the plastic wrap and bake for 60 – 65 minutes. Half way through baking, cover the bread loaf with a piece of foil to keep it from over-browning.
- Remove the loaf from the oven and let cool completely before slicing.
- Slice the entire loaf and store in a container at room temperature for up to 4 days or in the freezer for up to a month.
Notes
- Please read all the tips and tricks in the post before you get started. If you prefer to use a bread machine, check further up in the post for instructions.
- Use dry active yeast or quick yeast. Instant yeast is okay and you don't need to proof it, just make sure you get it in the oven as soon as it rises to the top of the loaf pan.
- For the gluten-free bread machine recipe, add wet ingredients to the pan, and then dry ingredients except the yeast, make a hole in the center of the dry ingredients and then sprinkle the yeast into the hole. See complete instructions just above the recipe.
- Make sure your water is between 95-110 degrees before adding the yeast. This is warm to the touch, but not hot.
- Line the loaf pan with parchment paper and then spray it with oil, this will help you remove the loaf from the pan. Pan size matters. If you use a wider pan your loaf will be wider, and shorter. If you use a narrower pan your loaf baking time might change.
- Flour blend option: 2 ½ cups of Bob's Red Mill 1-to-1 gluten-free flour blend + ½ cup millet flour + ¼ cup flaxseed meal. The 2 ½ cups of Bob's Red Mill 1-to-1 is in place of the rice flour, tapioca, and potatoe. You are swapping the three with Bob's.
- Egg free option: Swap out the 3 egg whites with 2 tablespoons of chia seed + 7 tablespoons of water (let sit for 5 minutes and stir before you add it to the mixture). Bake for 70 minutes (putting a piece of foil over the loaf to help prevent over-browning, half way through).
- Not everyone can have gums. You can use psyllium husk powder (not full husks) in this recipe. I only tested is once, but I used 3 tablespoons of psyllium husk powder in place of the xanthan gum.
Recommended Products
As an Amazon Associate and member of other affiliate programs, I earn from qualifying purchases. They never cost you extra.


Nutrition Information:
Yield:
12Serving Size:
1 sliceAmount Per Serving: Calories: 26Total Fat: 0gSaturated Fat: 0gTrans Fat: 0gUnsaturated Fat: 0gCholesterol: 0mgSodium: 14mgCarbohydrates: 5gFiber: 0gSugar: 0gProtein: 2g
This nutrition info is based on the exact ingredients and brands used at the time. It may not be 100% accurate. Please check your ingredients nutrition labels.
DID YOU MAKE THIS RECIPE?
Tag @glutenfreepalate on Instagram and hashtag it #glutenfreepalatebaker so we can see all the deliciousness!

)
Ashley S
Why do you think my bread turned out kinda wet/moist inside? I baked 1hr 10 mins.. yummy tho!!!
chrystal
Hi Ashley,
Did you bake it in the oven or a bread machine? There are a few reasons it could be wet/moist. One is if your oven temperature is off, and it isn't cooked all the way. Another could be if the ingredients added weren't the exact amounts. Bread machines are all different, and if you used a different setting or added the ingredients in the wrong order, it could also be wet.
Sorry to hear it wasn't perfect but I hope some of those tips help.
Best,
Chrystal
Sarah
Hi Crystal, is there a reason why I can't use instant yeast? I live in the Netherlands, we only have instant yeast or fresh yest...
chrystal
Some people have had challenges with the instant yeast, but recently some have commented that they used instant yeast and it worked great. You can use it.
Best,
Chrystal
Marsha K Binkley
Crystal
I just bought the machine you recommend . Awesome machine . Would like to make the bread but a little confused . The above says to bloom yeast and yet your instructions for making with machine says not to let yeast touch wet . I just don't see types of flour and measurements of ingredients for that recipe . Could you please assist ?
Marsha Binkley
chrystal
Hi Marsha,
Sorry for the confusion. I give instructions for the bread machine in the post as an alternative to using a oven. The recipe is below with the ingredients etc. which also includes the oven instructions. For the bread machine, you make a hole in the flour for the yeast. The bread machine will mix in it.
Add the warm water, oil, egg whites, and vinegar to the pan in your gluten-free bread machine.
Whisk together all dry ingredients except for the yeast (sugar, flours, flaxseed, xanthan gum, baking powder, and salt) and add to the bread machine pan on top of the wet ingredients, in a mound.
Make a hole in the center of the top of the dry ingredients and add the yeast. Don't let the yeast touch the wet ingredients.
If your machine has a "rest" setting. Cancel it, you don't need it. With the Zojirushi you have to do this before you select any other settings.
Select the gluten-free bread setting on your machine.
Close the lid and press "start".
I hope that helps,
Chrystal
Colleen R
I used the gluten free flour millet flour n flaxseed mixture plus other ingredients n mine turns out perfect!
I love it! I mix by hand with whisk and I love it toasted the best
THANKYOU so much for sharing!
chrystal
Hi Colleen,
I am so glad you like it. Thank you for letting me know.
Best,
Chrystal
Jessica Clemens
Question- I have flaxseeds but not ground flaxseeds, do they really have to be ground up or is it fine to just mix them in as is?
chrystal
Hi Jessica,
Do you have a food processor? I'd put some in a food processor and grind it then measure out the ground flaxseed.
Best,
Chrystal
Joan Barnett
Dear Crystal,
Could you tell me please, which company I could order the flours and starches from in order to make some of your gluten free bread?
I have 'phoned Dove's but to no avail.
Also is tapioca starch the same as tapioca flour.
and is potato starch the same as potato flour?
also is almond flour the same as ground almonds
chrystal
Hi Joan,
What area of the world are you located in? I use mostly Bob's Red Mill products, which you can order from them directly or you can order from Amazon, Thrive, etc.
I hope that helps,
Chrystal
Liz
Joan,
Tapioca flour and Tapioca starch are the same.
Potato flour and potato starch are NOT! They are 2 different products.
Almond flour is finely ground blanched almonds.
Joan Barnett
Hello Crystal,
What type of flour mixer do I need to buy for your bread machine recipe ,for the dry ingredients?
I do have a hand mixer with 2 spinning attachments already but don't know if that would be suitable.
Joan
chrystal
Hi Joan,
If you're using a bread machine (hopefully with a gf setting) the bread machine does the mixing for you. Just add the ingredients in the order listed in the bread machine instructions section. If you're mixing by hand and baking in a pan, I recommend a kitchenaid stand mixer. You can use an electric hand mixer, just be sure to mix it for the same amount of time.
Best,
Chrystal
Marsha K Binkley
I tossed two loaves out , but it was my fault . My eyes are bad and I could not see the 11 steps needed . So I made some changes . I bloomed my yeast with Swerve instead of honey or sugar it is diabetic approved . Then I stirred 2 eggs with the oil and added the bloomed yeast to this . Next ALL dry items were whisked together and then wet and dry blended and stirred well together . I oiled then I put it into my bread machine and set it for homemade and went through the timers for each step . Bread is wonderful , great taste and light enough to make 9 sandwiches
chrystal
I'm so glad you liked it. Thank you for sharing.
Best,
Chrystal
Monie DeGroat
I only have glass loaves pans. Is that a problem?
chrystal
I haven't personally made it in a glass pan, but it shouldn't be a problem. Let me know how it turns out!
Best,
Chrystal
Sonja
My husband is also yeast
sensitive can I substitute sourdough for the yeast and if so how much?
chrystal
Hi Sonja,
I haven't personally tried this without yeast or with sourdough. Sorry I can't be more help.
Best,
Chrystal